
2025-02-13 19:47:36,某些文章具有时效性,若有错误或已失效,请在下方留言。We’re going to build an app that translates English into multiple other languages, then exports it ready for Xcode to use in localizations.
我们将构建一个应用程序,将英语翻译成多种其他语言,然后将其导出以供 Xcode 在本地化中使用。
To follow along, create a new macOS project in Xcode using the App template, naming it AutoTranslate.
要继续作,请使用 App 模板在 Xcode 中创建一个新的 macOS 项目,并将其命名为 AutoTranslate。
From zero to translated 从零到翻译
It is astonishingly easy to translate simple text using Apple’s Translation framework – they’ve built it specifically with SwiftUI in mind, so it hooks directly into our layouts. As you’ll see, this also makes more advanced translations more tricky, but we’ll find a way through.
使用 Apple 的翻译框架翻译简单文本非常容易——他们专门在 SwiftUI 的情况下构建了它,因此它直接挂接到我们的布局中。正如您将看到的,这也使更高级的翻译更加棘手,但我们会找到解决方法。
First, the most important step is to add a new import to the top of ContentView.swift:
首先,最重要的一步是将新的导入添加到 ContentView.swift 的顶部:
import Translation
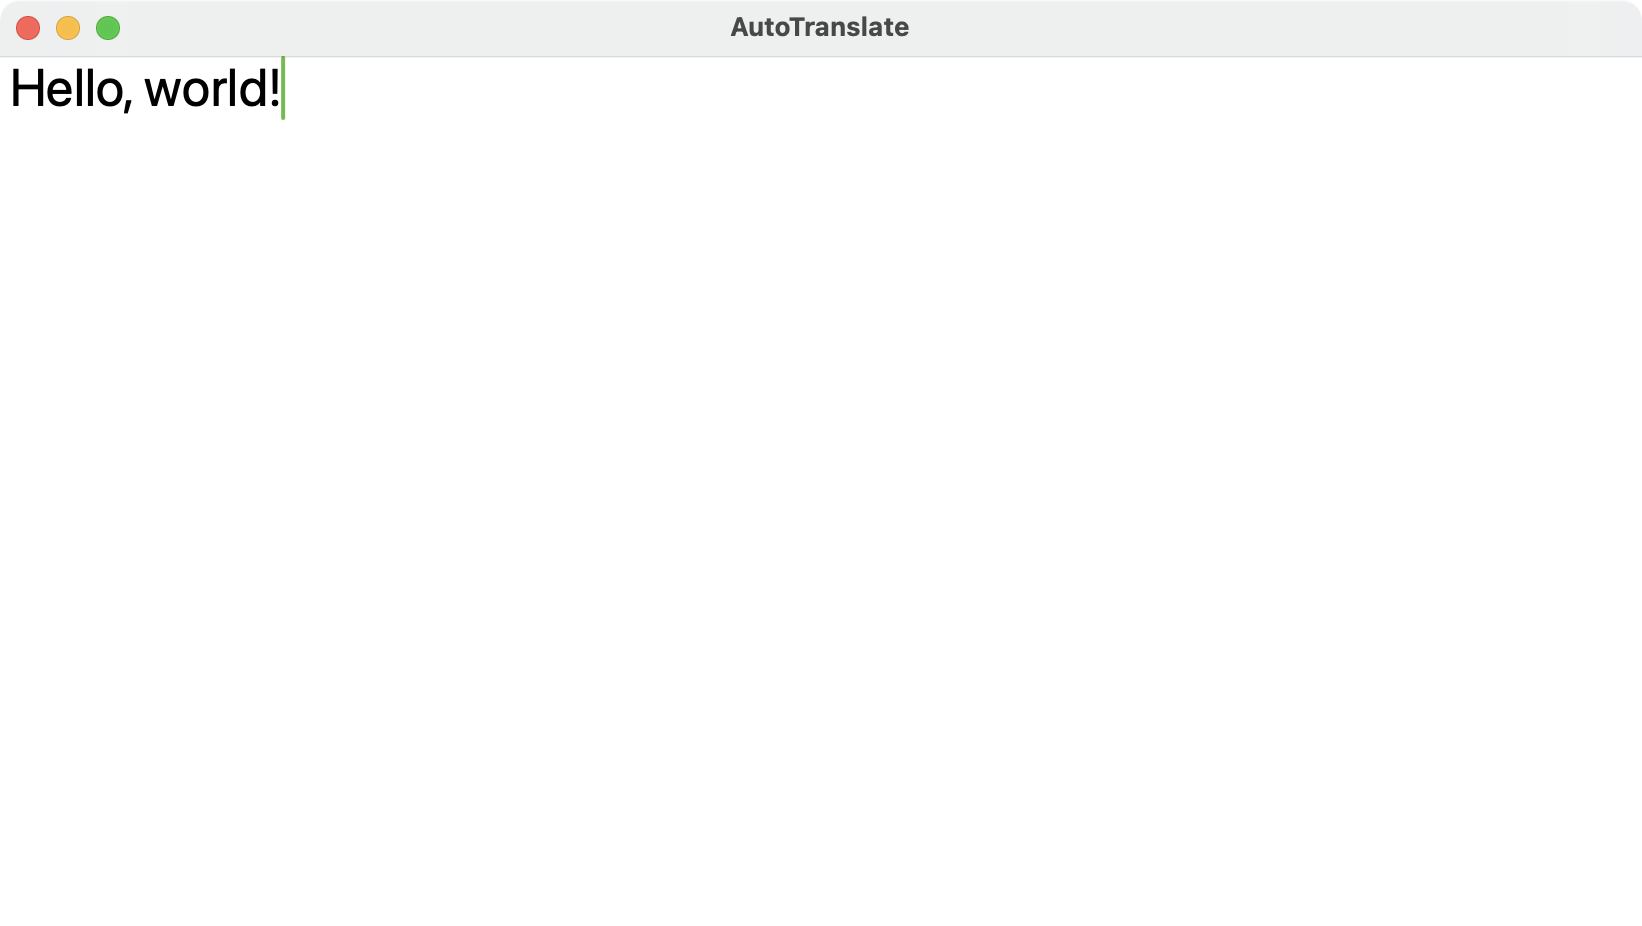
Second, we need some text to translate. This will be stored as an @State property in our view, so we can modify it:
其次,我们需要一些文本来翻译。这将作为 @State 属性存储在我们的视图中,因此我们可以对其进行修改:
@State private var input = "Hello, world!"
Third, we need an editable text view for that string. Replace your default body property code with this:
第三,我们需要该字符串的可编辑文本视图。将默认的 body 属性代码替换为以下内容:
TextEditor(text: $input)
    .font(.largeTitle)
At the core of the Translation framework is a class called TranslationSession, which is responsible for performing translations. But we can’t make one of these directly – SwiftUI will create one, then hand it over to us to use.
Translation 框架的核心是一个名为 TranslationSession 的类,它负责执行翻译。但是我们不能直接制作其中一个 – SwiftUI 会创建一个,然后将其交给我们使用。
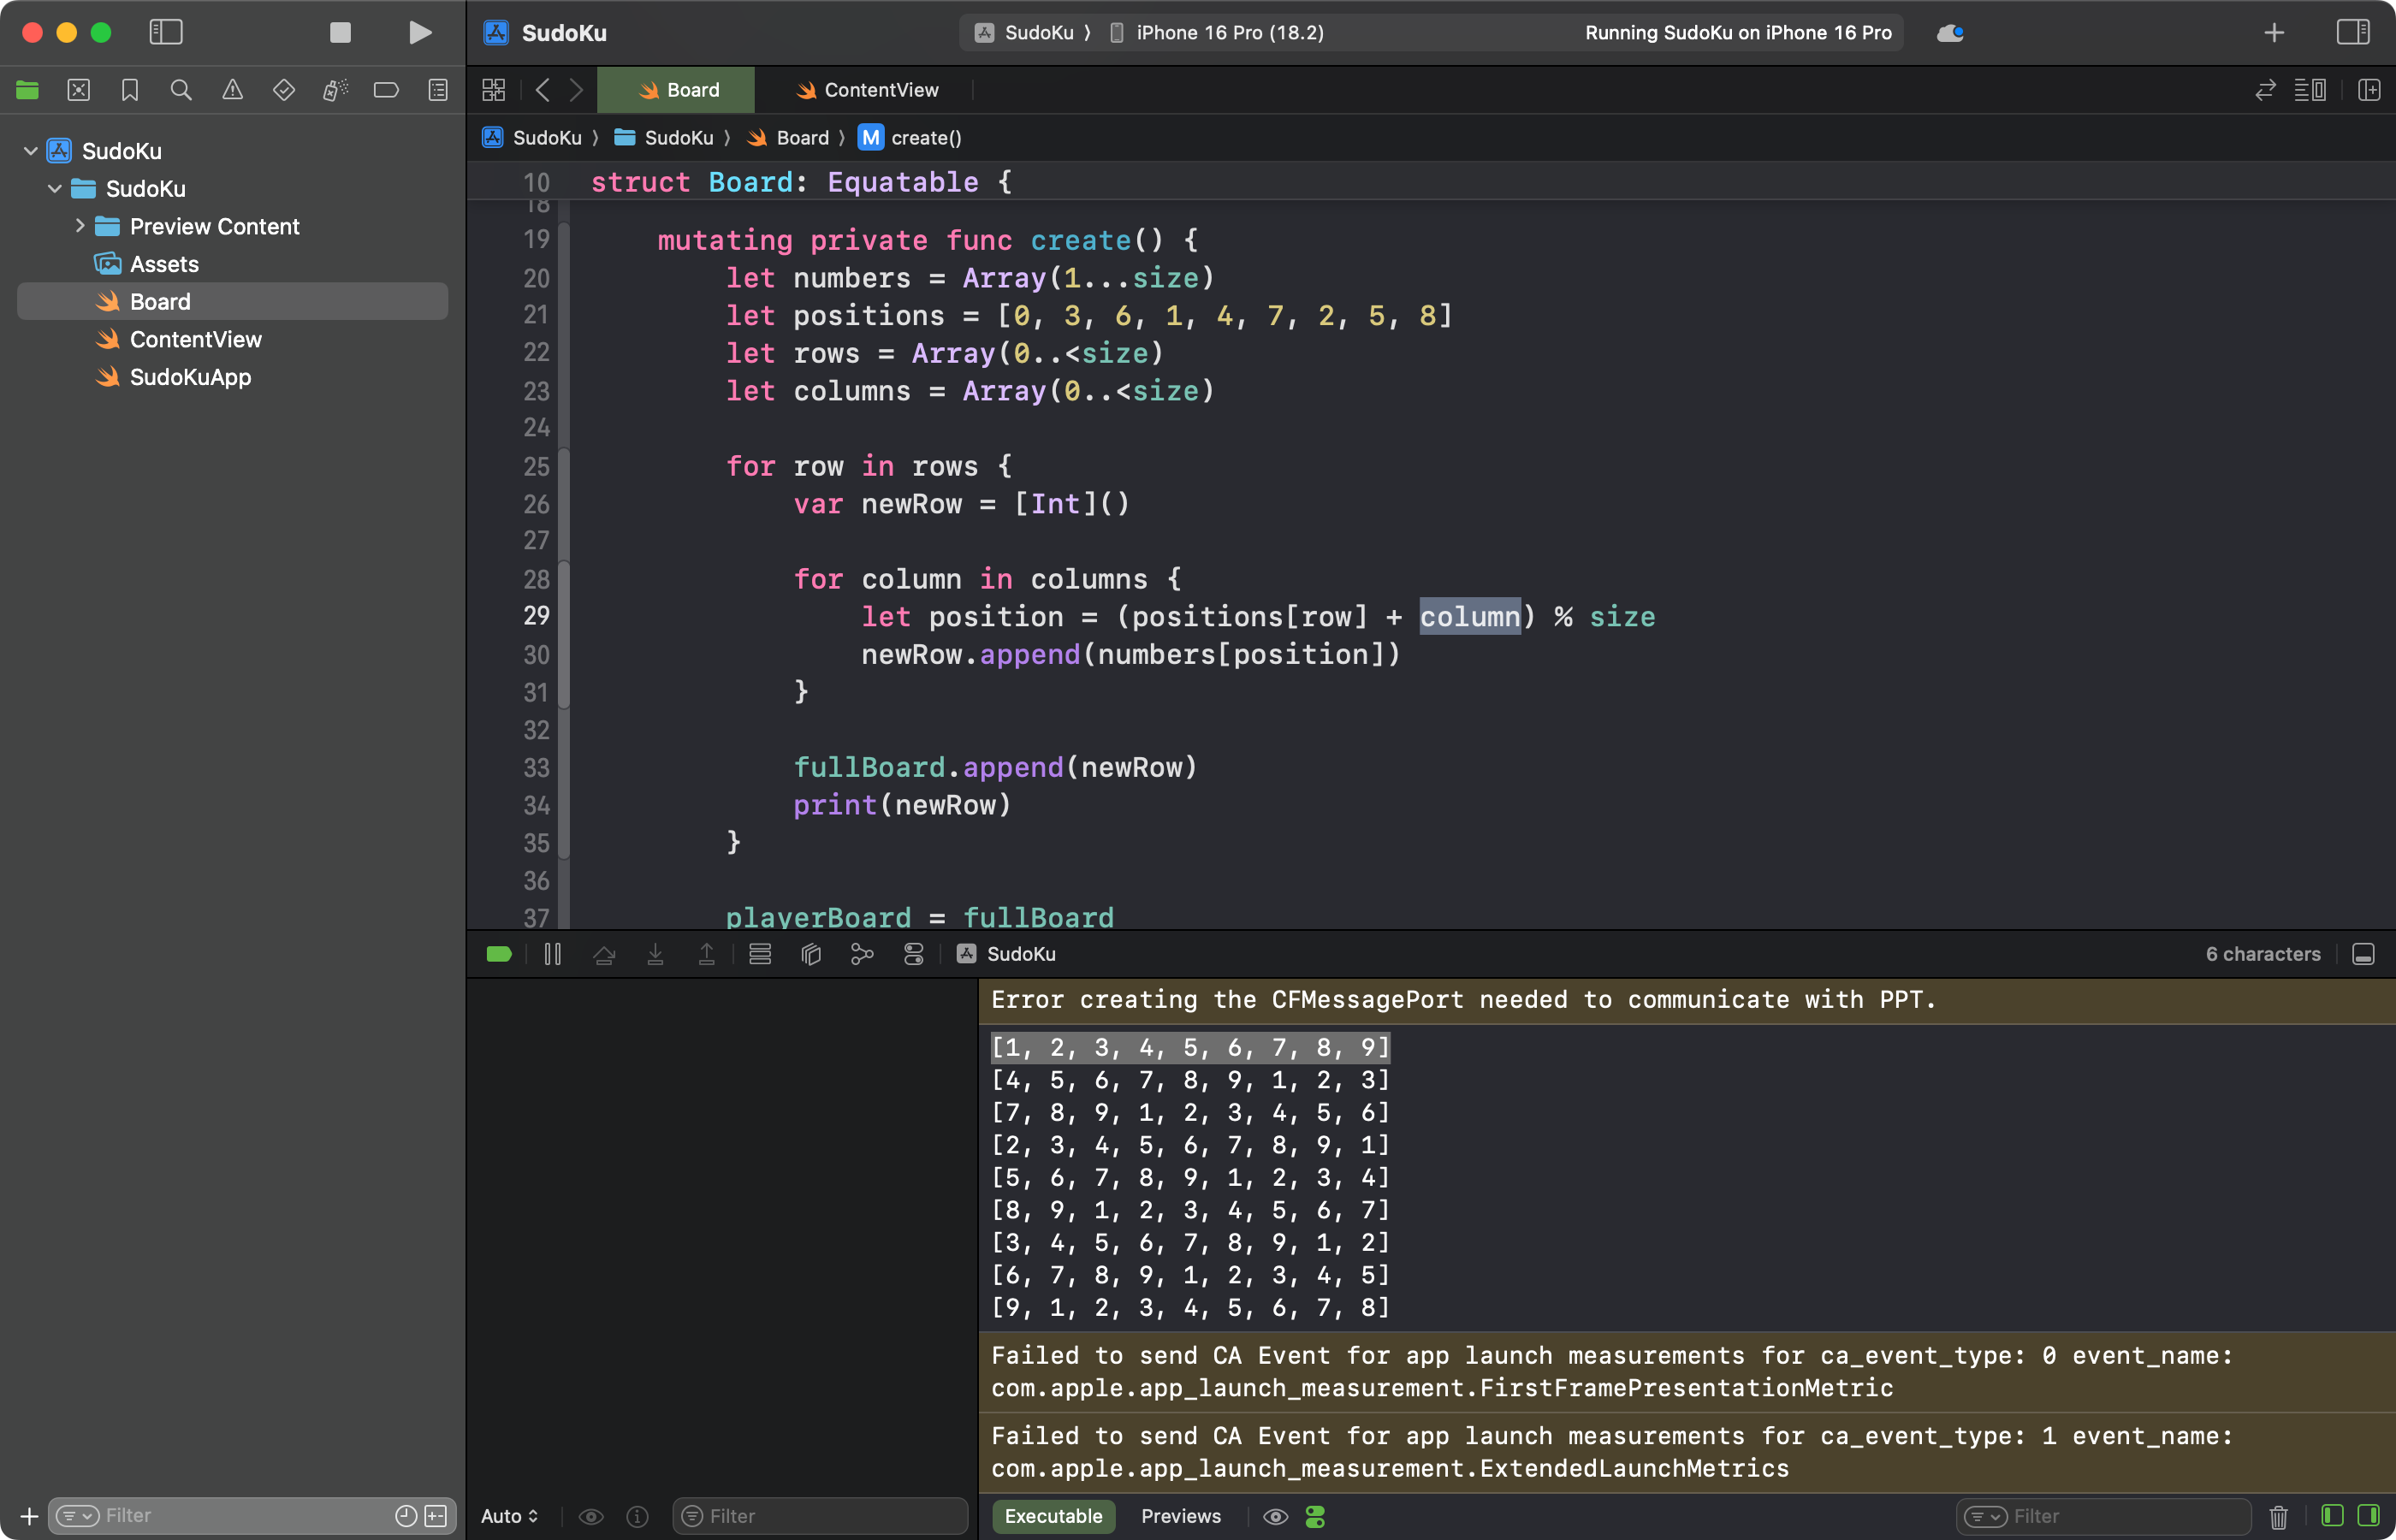
So, we’re going to write a method in ContentView that expects to receive a TranslationSession object to work with. We can then ask that to translate our input string, and print it Xcode’s debug console.
因此,我们将在 ContentView 中编写一个方法,该方法期望接收要使用的 TranslationSession 对象。然后,我们可以要求它来翻译我们的输入字符串,并将其打印到 Xcode 的调试控制台。
Add this now: 现在添加以下内容:
func translate(using session: TranslationSession) async {
    do {
        let result = try await session.translate(input)
        print(result.targetText)
    } catch {
        print(error.localizedDescription)
    }
}
The last step is the one that is both simplest and mosr complex: we need to tell SwiftUI to call that method as a translation task, which means SwiftUI will create a translation session and pass it to our method as soon as the view is shown.
最后一步既简单又复杂:我们需要告诉 SwiftUI 将该方法作为翻译任务调用,这意味着 SwiftUI 将创建一个翻译会话,并在视图显示后立即将其传递给我们的方法。
Add this modifier to the TextEditor:
将此修饰符添加到 TextEditor 中:
.translationTask(action: translate)
And that’s it – that’s the initial step complete! Run the code now and you’ll see SwiftUI displays a sheet asking the user to select which language the input text is in, because it can’t be guessed.
就是这样 – 这就是完成的初始步骤!现在运行代码,您将看到 SwiftUI 显示一个表格,要求用户选择输入文本的语言,因为它无法被猜到。
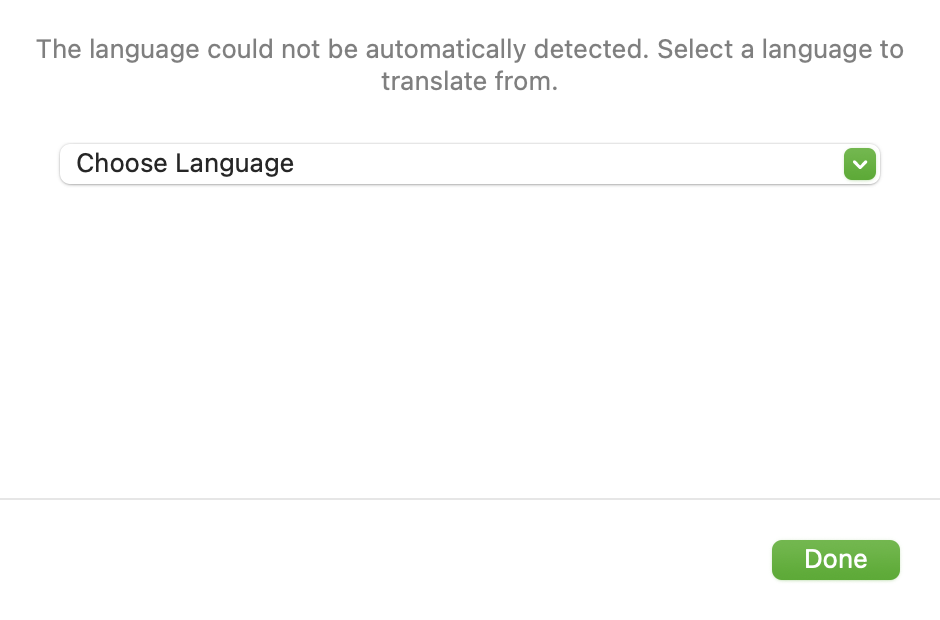
Go ahead and choose English, and the sheet will be replaced with a second one asking you download the languages to translate. Go ahead and click either Download button to start it, then after a few seconds everything should finish and hopefully you should also be able to open up Xcode’s debug console to see the translation of our text.
继续并选择 English,该工作表将替换为第二个工作表,要求您下载要翻译的语言。继续并单击任一 下载 按钮启动它,然后几秒钟后一切都应该完成,希望您还应该能够打开 Xcode 的调试控制台来查看我们文本的翻译。
Tip: You can manually download or delete these language packs from System Settings – go to General > Language and Region, then click the Translation Languages button.
提示: 您可以从系统设置中手动下载或删除这些语言包 – 通用>语言和区域,然后单击翻译语言按钮。
I see “Bonjour, le monde !”, but you might see something different. Either way it’s interesting: why did it assume I wanted French?
我看到的是 “Bonjour, le monde !”,但你可能会看到不同的东西。无论哪种方式,这都很有趣:为什么它假设我想要法语?
What’s happening is that without a specific target language, the Translation framework takes its best guess at what I’d like. This is why you might see something different, depending on what system thinks is best for you.
现在的情况是,如果没有特定的目标语言,翻译框架会根据我想要的语言进行最佳猜测。这就是为什么您可能会看到不同的东西,具体取决于系统认为最适合您的内容。
Notice how all the work of figuring out the source language, detecting which languages are installed, prompting the user, and performing the download are all handled for us really smoothly – SwiftUI and Translation are extremely tightly bonded.
请注意,找出源语言、检测安装了哪些语言、提示用户和执行下载的所有工作都是非常顺利地为我们处理的——SwiftUI 和翻译是极其紧密的结合。
To make this more explicit, we’re going to ask for translation from English to Spanish. This is done by creating a new translation configuration, again using @State so it’s guaranteed to stay alive for the duration of our ContentView:
为了更明确地说明这一点,我们将要求将英语翻译成西班牙语。这是通过创建新的翻译配置来完成的,同样使用 @State 这样可以保证它在 ContentView 的持续时间内保持活动状态:
@State private var configuration = TranslationSession.Configuration(
    source: Locale.Language(identifier: "en"),
    target: Locale.Language(identifier: "es")
)
We can then pass that into our translationTask() modifier:
然后,我们可以将其传递给我们的 translationTask() 修饰符:
.translationTask(configuration, action: translate)
And now if we run the app again, two things have changed:
现在,如果我们再次运行该应用程序,则有两件事发生了变化:
- We’re immediately prompted to download the Spanish translation pack.
系统会立即提示我们下载 Spanish 翻译包。 - We’re no longer asked to identify the source language, because we’ve been explicit that it’s English.
我们不再被要求确定源语言,因为我们已经明确表示它是英语。
Now we’ll see “¡Hola, mundo!” in Xcode’s debug console – don’t worry if it takes a few seconds to appear, because it’s all being done asynchronously.
现在我们将在 Xcode 的调试控制台中看到 “¡Hola, mundo!”——如果它需要几秒钟才能出现,请不要担心,因为这一切都是异步完成的。
Before we move on, try changing the input text to something else, such as “Goodbye, world!”
在我们继续之前,请尝试将输入文本更改为其他内容,例如“Goodbye, world!”
Spoiler: You can type as much as you want, and nothing will happen. This is because the translation session doesn’t actually know the input text is going to change over time, so it won’t update its translations.
剧透:你想打多少就打多少,什么都不会发生。这是因为翻译会话实际上并不知道输入文本会随时间而变化,因此它不会更新其翻译。
So, to really finish this initial step, let’s fix this code so that it translates whatever you type, as you type it. Again, we can’t actually trigger translation because it’s all handled by SwiftUI, but we can tell the framework that its configuration is stale and needs to be processed again.
因此,要真正完成这个初始步骤,让我们修复这段代码,以便它在你键入时转换你键入的任何内容。同样,我们实际上无法触发翻译,因为它都是由 SwiftUI 处理的,但我们可以告诉框架它的配置是过时的,需要再次处理。
Add this modifier below translationTask():
在 translationTask() 下面添加此修饰符:
.onChange(of: input) {
    configuration.invalidate()
}
Invalidating the configuration triggers the translation, which means changing our string now immediately translates whatever is there into Spanish – make sure and try it out!
使配置无效会触发翻译,这意味着更改我们的字符串现在会立即将那里的任何内容翻译成西班牙语 – 确保并尝试一下!
Translating multiple languages at once 一次翻译多种语言
For this app to work well, users need to see a list of possible languages they can select from, and our app will then translate their input text into every language in one pass.
为了使此应用程序正常运行,用户需要查看他们可以选择的可能语言列表,然后我们的应用程序将一次性将他们的输入文本翻译成每种语言。
You might be able to see why this is tricky: we can’t create our own translation session, but instead need to set up a configuration that drives the session for us. So, translating multiple languages means setting up a configuration, waiting for the results, changing the configuration, waiting for the results, and so on – it’s tricky to get right, and I hope it’s something Apple makes a little easier in a future release.
您也许能明白为什么这很棘手:我们不能创建自己的翻译会话,而是需要设置一个配置来为我们驱动会话。因此,翻译多种语言意味着设置配置、等待结果、更改配置、等待结果等等 – 要正确处理是很棘手的,我希望 Apple 在未来的版本中会让这件事变得更容易一些。
First things first: in order to support lots of languages, we need a new struct that represents a single possible language. This needs to store the user-facing language name, whether it’s selected or not, and also the language code – the internal name that uniquely identifies this language.
首先要做的事情是:为了支持多种语言,我们需要一个代表单一可能语言的新结构体。这需要存储面向用户的语言名称(无论是否被选中)以及语言代码 – 唯一标识此语言的内部名称。
Tip: Language codes are really useful when you want to support variants, such as Traditional Chinese and Simplified Chinese, or – to quote a well-known internet joke from the past – Traditional English and Simplified English.
提示: 当您想要支持变体时,例如繁体中文和简体中文,或者 – 引用过去一个著名的互联网笑话 – 繁体英语和简体中文,语言代码非常有用。
So, let’s start with a new struct to store a single language. Create a new Swift file called Language.swift, then give it this code:
所以,让我们从一个新的结构体开始来存储一种语言。创建一个名为 Language.swift 的新 Swift 文件,然后为其提供以下代码:
struct Language: Hashable, Identifiable {
    var id: String
    var name: String
    var isSelected: Bool
}
Now we need a whole bunch of these for a variety of languages. You can query these from the system if you like, but we’re going to write in the exact ones we’ll support.
现在我们需要一大堆用于各种语言的 TOOLS。如果您愿意,您可以从系统中查询这些内容,但我们将编写我们将支持的确切内容。
Add this to ContentView:
将此内容添加到 ContentView:
@State private var languages = [
    Language(id: "ar", name: "Arabic", isSelected: false),
    Language(id: "zh", name: "Chinese", isSelected: false),
    Language(id: "nl", name: "Dutch", isSelected: false),
    Language(id: "fr", name: "French", isSelected: false),
    Language(id: "de", name: "German", isSelected: false),
    Language(id: "hi", name: "Hindi", isSelected: false),
    Language(id: "in", name: "Indonesian", isSelected: false),
    Language(id: "it", name: "Italian", isSelected: false),
    Language(id: "ja", name: "Japanese", isSelected: false),
    Language(id: "ko", name: "Korean", isSelected: false),
    Language(id: "pl", name: "Polish", isSelected: false),
    Language(id: "pt", name: "Portuguese", isSelected: false),
    Language(id: "ru", name: "Russian", isSelected: false),
    Language(id: "es", name: "Spanish", isSelected: true),
    Language(id: "th", name: "Thai", isSelected: false),
    Language(id: "tr", name: "Turkish", isSelected: false),
    Language(id: "uk", name: "Ukrainian", isSelected: false),
    Language(id: "vi", name: "Vietnamese", isSelected: false),
]
Tip: I made one language selected by default, because it’s not helpful to have zero languages selected.
提示: 默认情况下,我选择了一种语言,因为选择零种语言没有帮助。
Now that we have a whole range of languages to work with, we can show them all a form as a collection of Toggle checkboxes. This means dividing our UI up into two parts, which I think works best with a NavigationSplitView, with our TextEditor as the detail view.
现在我们可以使用各种语言,我们可以向它们显示一个表单作为 Toggle 复选框的集合。这意味着将我们的 UI 分为两部分,我认为这与 NavigationSplitView 一起使用效果最好,并将我们的 TextEditor 作为详细信息视图。
Adjust your body code to this:
将你的 body code 调整为:
NavigationSplitView {
    ScrollView {
        Form {
            ForEach($languages) { $language in
                Toggle(language.name, isOn: $language.isSelected)
            }
        }
    }
} detail: {
    TextEditor(text: $input)
        .font(.largeTitle)
}
.translationTask(configuration, action: translate)
.onChange(of: input) {
    configuration.invalidate()
}
I’ve moved the old modifiers so they are attached to the NavigationSplitView rather than to the TextEditor, but that’s just personal choice.
我移动了旧的修饰符,以便将它们附加到 NavigationSplitView 而不是 TextEditor,但这只是个人选择。
Here’s where things get tricky: for our complete translation process to begin, we need to work through all the languages they selected one by one, which means repeatedly invalidating our configuration and waiting for SwiftUI to complete the translation task.
事情变得棘手了:为了开始我们完整的翻译过程,我们需要一一处理他们选择的所有语言,这意味着反复使我们的配置无效并等待 SwiftUI 完成翻译任务。
Getting this to work well means adding three new properties to ContentView:
要使其正常工作,意味着向 ContentView 添加三个新属性:
- What are the languages we’re actively translating?
我们正在积极翻译哪些语言? - Which language are we translating right this moment?
我们现在正在翻译哪种语言? - What is the current state of our app – is the user busy configuring their translations, are we currently performing translations, or is the translation complete?
我们应用程序的当前状态如何 – 用户是否忙于配置他们的翻译,我们当前是否正在执行翻译,或者翻译是否已完成?
The first two are simple: an array of languages, and an integer storing which index we’re currently working on. Add these two to ContentView now:
前两个很简单:一个语言数组,以及一个整数,用于存储我们当前正在处理的索引。现在将这两个添加到 ContentView 中:
@State private var translatingLanguages = [Language]()
@State private var languageIndex = Int.max
Tip: I’ve used Int.max for the default languageIndex value, because it will definitely be beyond the number of items in the translatingLanguages array.
提示: 我已将 Int.max 用于默认 languageIndex 值,因为它肯定会超出 translatingLanguages 数组中的项数。
The third property is best expressed as an enum, so add this inside the ContentView struct:
第三个属性最好表示为枚举,因此请在 ContentView 结构中添加以下内容:
enum TranslationState {
    case waiting, creating, done
}
And then add its corresponding property:
然后添加其相应的属性:
@State private var translationState = TranslationState.waiting
With those three in place we can make our code handle multiple translations, but again we need to do it carefully – we’re repeatedly setting up the translation, waiting for SwiftUI to complete it, then going on to the next language.
有了这三个位置,我们可以让我们的代码处理多个翻译,但同样需要小心翼翼地进行 – 我们反复设置翻译,等待 SwiftUI 完成翻译,然后继续处理下一种语言。
We can break this down into three steps, starting with setting up a single translation. This will:
我们可以将其分解为三个步骤,首先是设置单个翻译。这将:
- Make sure we haven’t advanced
languageIndexbeyond the size of ourtranslatingLanguagesarray.
确保我们没有将languageIndex推进到translatingLanguages数组的大小之外。 - Adjust the translation configuration to the new target language.
将翻译配置调整为新的目标语言。 - Invalidate it, thus telling SwiftUI to refresh the translation task.
使其无效,从而告诉 SwiftUI 刷新翻译任务。
Add this method to ContentView:
将此方法添加到 ContentView:
func doNextTranslation() {
    guard languageIndex < translatingLanguages.count else {
        translationState = .done
        return
    }

    let language = translatingLanguages[languageIndex]
    configuration.source = Locale.Language(identifier: "en")
    configuration.target = Locale.Language(identifier: language.id)
    configuration.invalidate()
}
The second step is to adjust our translate() method so it understands it’s part of a chain of translations. This means three things:
第二步是调整我们的 translate() 方法,使其理解它是翻译链的一部分。这意味着三件事:
- We only want to perform our translation if we are currently in the
.creatingtranslation state.
我们只希望在当前处于.creating翻译状态时执行翻译。 - Once a translation completes, we need to increment
languageIndexthen calldoNextTranslation()to move on to the next language.
翻译完成后,我们需要增加languageIndex,然后调用doNextTranslation()以继续处理下一种语言。 - If anything goes wrong, we need to put
translationStateback to.waiting.
如果出现任何问题,我们需要将translationState放回.waiting。
Replace your current method with this:
将您当前的方法替换为:
func translate(using session: TranslationSession) async {
    do {
        if translationState == .creating {
            let result = try await session.translate(input)
            print(result.targetText)

            languageIndex += 1
            doNextTranslation()
        }
    } catch {
        print(error.localizedDescription)
        translationState = .waiting
    }
}
That catch block is important to handle well, because the user can skip the request to download a language pack, or perhaps is working offline.
妥善处理该 catch 块非常重要,因为用户可以跳过下载语言包的请求,或者可能正在脱机工作。
Finally we need a new method to kickstart the whole process. This means filling the translatingLanguages array with all the selected languages, setting languageIndex to zero, then beginning.
最后,我们需要一种新的方法来启动整个过程。这意味着用所有选定的语言填充 translatingLanguages 数组,将 languageIndex 设置为零,然后开始。
Add this to ContentView now:
立即将以下内容添加到 ContentView:
func createAllTranslations() {
    translatingLanguages = languages.filter(\.isSelected)
    languageIndex = 0
    translationState = .creating
    doNextTranslation()
}
That completes the process of creating a translation chain, so all that remains is to add some sort of button to set the process moving.
这样就完成了创建翻译链的过程,所以剩下的就是添加某种按钮来设置过程移动。
Adjust the detail of your NavigationSplitView to this:
将 NavigationSplitView 的 detail 调整为:
VStack(spacing: 0) {
    TextEditor(text: $input)
        .font(.largeTitle)

    Button("Create Translations", action: createAllTranslations)
}
Now give it a try! You should find you can select all the languages you want, and it might work. I say “might” for two reasons:
现在试一试吧!您应该会发现您可以选择所需的所有语言,并且可能会起作用。我说“可能”有两个原因:
- The prompt to download a language only appears when we begin a translation for that language, which means asking to download a language, then translate it, then ask to download another, then translate that, and so on. It’s a bit annoying the first time.
仅当我们开始翻译某种语言时,才会显示下载该语言的提示,这意味着要求下载一种语言,然后翻译它,然后要求下载另一种语言,然后翻译该语言,依此类推。第一次有点烦人。 - I’ve found that the Translation framework only sometimes likes following this process. It might work flawlessly for you – and of course it might get better as Apple refines their API – but right now it’s a bit flaky for me.
我发现 Translation 框架只是有时喜欢遵循这个过程。它可能对你完美无缺——当然,随着 Apple 改进他们的 API,它可能会变得更好——但现在对我来说有点片面。
But we can do better!
但我们可以做得更好!
Adding some polish 添加一些润色
Our app would be less annoying and less flaky if we requested new languages as soon as the user selects them, which is surprisingly easy to accomplish.
如果我们在用户选择新语言后立即请求它们,我们的应用程序就会不那么烦人,也不会 那么不稳定,这非常容易实现。
You might wonder why I might the Language struct conform to Hashable earlier. Well, here’s why: if we watch our languages array for changes, we convert the old and new value into a set, then use set algebra to see what changed. Once we know what was added, if anything, we can use that for our configuration’s source language, and invalidate the configuration so that SwiftUI thinks translation needs to happen immediately.
你可能想知道为什么我会更早地让 Language 结构符合 Hashable。嗯,原因如下:如果我们观察 languages 数组的变化,我们将旧值和新值转换为一个集合,然后使用集合代数来查看变化。一旦我们知道添加了什么(如果有的话),我们就可以将其用于配置的源语言,并使配置无效,以便 SwiftUI 认为需要立即进行翻译。
Add this new method to ContentView:
将此新方法添加到 ContentView:
func updateLanguages(oldValue: [Language], newValue: [Language]) {
    let oldSet = Set(oldValue.filter(\.isSelected))
    let newSet = Set(newValue.filter(\.isSelected))

    // Subtract the old languages from the new languages.
    let difference = newSet.subtracting(oldSet)

    // Check to see if we had an addition.
    if let newLanguage = difference.first {
        configuration.source = Locale.Language(identifier: newLanguage.id)
        configuration.invalidate()
    }

    translationState = .waiting
}
Note: I believe that changing the source value should trigger an invalidation automatically, but there’s no harm being sure!
注意: 我相信更改source值应该会自动触发失效,但可以肯定也没什么坏处!
Now we can add a second onChange() modifier to the body of our view:
现在我们可以向视图的主体添加第二个 onChange() 修饰符:
.onChange(of: languages, updateLanguages)
But that’s only part of the story. You see, invalidating the session configuration starts translation, but we don’t actually want a full translation – we just want to prepare for translation.
但这只是故事的一部分。你看,使 session 配置无效会开始翻译,但我们实际上并不想要完整的翻译——我们只是想为翻译做准备。
This is done using a separate method call on TranslationSession, called prepareTranslation(). It does exactly what we want here: it prompts the user to download languages ahead of time, without doing the actual translation.
这是通过 TranslationSession 上的单独方法调用(称为 prepareTranslation())完成的。它完全符合我们在这里的作用:它提示用户提前下载语言,而无需进行实际翻译。
In our translate() method we already have a check to see whether translationState is equal to .creating, but we’re going to change that now: if our state is .waiting then we’ll prepare for translation, otherwise we’ll run our existing translation code.
在我们的 translate() 方法中,我们已经检查了 translationState 是否等于 .creating,但我们现在要改变它:如果我们的状态是 .waiting,那么我们将准备翻译,否则我们将运行现有的翻译代码。
Replace the current condition with this:
将当前条件替换为以下内容:
if translationState == .waiting {
    try await session.prepareTranslation()
} else {
Now our app behaves even better: we’ll be asked to download our initial languages on first run, then again on a case-by-case basis whenever we select extra languages.
现在,我们的应用程序表现得更好了:第一次运行时会要求我们下载初始语言,然后在我们选择额外语言时根据具体情况再次下载。
It’s an improvement, and this app is almost useful. But before we move onto the final step, I want to make two small tweaks.
这是一个改进,这个应用程序几乎很有用。但在我们进入最后一步之前,我想做两个小的调整。
First, changing the input string shouldn’t call invalidate() on our configuration any more. That was fine back when we had a single language, but now it should just set our app’s state back to .waiting – trying to constantly stream in results for all languages is a bad idea!
首先,更改输入字符串不应该再在我们的配置上调用 invalidate() 了。当我们只有一种语言时,这很好,但现在它应该将我们应用程序的状态设置回 .waiting —— 试图不断流式传输所有语言的结果是一个坏主意!
So, change one of the onChange() modifiers to this:
因此,将其中一个 onChange() 修饰符更改为:
.onChange(of: input) {
    translationState = .waiting
}
Second, we don’t want the Create Translations button to be visible all the time, because a translation might currently be in progress.
其次,我们不希望 Create Translations 按钮一直可见,因为翻译当前可能正在进行中。
To make this better we’re going to wrap that button in a Group showing one of three things depending on the current state, like this:
为了更好地做到这一点,我们将该按钮包装在一个 Group 中,根据当前状态显示以下三项内容之一,如下所示:
Group {
    switch translationState {
    case .waiting:
        Button("Create Translations", action: createAllTranslations)
    case .creating:
        ProgressView()
    case .done:
        Text("Done")
    }
}
.frame(height: 60)
Tip: Adding a fixed frame height stops the view from jumping around between the three layouts.
提示: 添加固定的框架高度可阻止视图在三个布局之间跳转。
Exporting to JSON 导出为 JSON
So far the app is an interesting concept, but not useful. In this last step that’s going to change: we’re going to upgrade the project so that it’s able to export JSON in Xcode’s String Catalog format. This means we’ll be able to enter a bunch of strings all at once, and export them as a String Catalog file that can be imported back into Xcode.
到目前为止,该应用程序是一个有趣的概念,但没有用。在最后一步中,情况将发生变化:我们将升级项目,使其能够以 Xcode 的 String Catalog 格式导出 JSON。这意味着我们将能够一次输入一堆字符串,并将它们导出为 String Catalog 文件,该文件可以导入回 Xcode。
Almost all the work here is defining a set of structs that match the structure Xcode expects. It’s not complex, but it is precise.
这里几乎所有的工作都是定义一组与 Xcode 期望的结构相匹配的结构。它并不复杂,但很精确。
To see the exact file format you need, press Cmd+N to make a new file, then select String Catalog. The default name of Localizable.xcstrings is fine, so please use that. We need to add some example values to the new string catalog so we can see exactly how it looks, so:
要查看所需的确切文件格式,请按 Cmd+N 创建新文件,然后选择 String Catalog。Localizable.xcstrings 的默认名称很好,因此请使用该名称。我们需要向新的字符串目录添加一些示例值,以便我们可以准确地看到它的外观,因此:
- Click + in the content view, which is the one showing “English”.
单击内容视图中的 +,该视图显示 “English” 的视图。 - Add French then German. 添加法语,然后添加德语。
- Press Cmd+B to build your project, which will cause Xcode to extract existing strings from your code and place them into the catalog.
按 Cmd+B 构建您的项目,这将使 Xcode 从您的代码中提取现有字符串并将它们放入目录中。 - Now select French, then click the gray “Create Translations” text underneath “French (fr)”, and enter some text. It doesn’t need to be accurate – in fact, I’d suggest making it something obvious like “French for Create Translations”.
现在选择 French,然后单击 “French (fr)” 下方的灰色 “Create Translations” 文本,然后输入一些文本。它不需要准确——事实上,我建议把它写成明显的东西,比如 “French for Create Translations”。 - Now do the same for “Done”.
现在对 “Done” 执行相同的作。 - Repeat the process for German.
对 German 重复此过程。
Now that we’ve filled in our translations with example text, I want you to right-click on Localizable.xcstring in the project navigator and select Open As > Source Code. This will show you the underlying JSON we’re working with – you might find it easier to copy that text to an external text editor such as Sublime Text, for easier reference.
现在我们已经用示例文本填充了我们的翻译,我希望您右键单击项目导航器中的 Localizable.xcstring,然后选择 Open As > Source Code。这将向你展示我们正在使用的基础 JSON——你可能会发现将该文本复制到外部文本编辑器(如 Sublime Text)更容易,以便于参考。
You should see something like this:
您应该看到如下内容:
{
  "sourceLanguage" : "en",
  "strings" : {
    "Create Translations" : {
      "localizations" : {
        "de" : {
          "stringUnit" : {
            "state" : "translated",
            "value" : "German for Create Translations"
          }
        },
        "fr" : {
          "stringUnit" : {
            "state" : "translated",
            "value" : "French for Create Translations"
          }
        }
      }
    },
    "Done" : {
      "localizations" : {
        "de" : {
          "stringUnit" : {
            "state" : "translated",
            "value" : "German for Done"
          }
        },
        "fr" : {
          "stringUnit" : {
            "state" : "translated",
            "value" : "French for Done"
          }
        }
      }
    }
  },
  "version" : "1.0"
}
It’s quite a complex structure in code, but it’s like this because there are lots of other possible configurations you can add such as comments, flagging translations for review, and similar.
它在代码中是一个相当复杂的结构,但就像这样,因为你可以添加许多其他可能的配置,例如注释、标记翻译以供审阅等。
Creating data structures is best done from the inside out, so let’s start with the smallest thing we’re working, which is a single translation:
创建数据结构最好从内到外完成,因此让我们从我们正在工作的最小事情开始,即单个转换:
"stringUnit" : {
    "state" : "translated",
    "value" : "German for Create Translations"
}
So, that’s the string “translated”, followed by the actual translation.
所以,这是字符串 “translated”,后面是实际的翻译。
Create a new Swift file called TranslationModels.swift, and start by giving it this code:
创建一个名为 TranslationModels.swift 的新 Swift 文件,并首先为其提供以下代码:
struct TranslationUnit: Codable {
    var state = "translated"
    var value: String
}
Above a single unit is a translation. This can have other data, but here all we need is a single string unit, like this:
单个单位上方是翻译。这可以有其他数据,但这里我们只需要一个字符串单元,就像这样:
struct TranslationLanguage: Codable {
    var stringUnit: TranslationUnit
}
Above a language is a string, which holds multiple languages keyed by their language code. So, “fr” would hold the French-language translation for a string, for example:
语言上方是一个字符串,其中包含多种语言,这些语言由其语言代码作为键控。因此,“fr” 将保存字符串的法语翻译,例如:
struct TranslationString: Codable {
    var localizations = [String: TranslationLanguage]()
}
And above the language – at the very top of our data model – is the whole strings catalog document. This is the trickiest one, because we need to conform to both Codable and SwiftUI’s FileDocument protocol so we’re able to export it correctly.
在语言之上 – 在我们数据模型的最顶部 – 是整个字符串目录文档。这是最棘手的,因为我们需要同时遵守 Codable 和 SwiftUI 的 FileDocument 协议,以便我们能够正确导出它。
First, add two extra imports to the top, so we get access to the extra API we need to make this work:
首先,在顶部添加两个额外的导入,这样我们就可以访问完成这项工作所需的额外 API:
import SwiftUI
import UniformTypeIdentifiers
Second, we need to create a new UTType to represent the type identifier for string catalogs, because SwiftUI doesn’t have one built-in:
其次,我们需要创建一个新的 UTType 来表示字符串目录的类型标识符,因为 SwiftUI 没有内置的:
extension UTType {
    static var xcStrings = UTType("com.apple.xcode.xcstrings")!
}
And third we can implement the first part of our document, which means telling SwiftUI what it can read and write, as well as storing the three properties we need to make a valid string catalog:
第三,我们可以实现文档的第一部分,这意味着告诉 SwiftUI 它可以读取和写入什么,以及存储我们需要的三个属性,以创建一个有效的字符串目录:
struct TranslationDocument: Codable, FileDocument {
    static var readableContentTypes = [UTType.xcStrings]

    var sourceLanguage: String
    var strings: [String: TranslationString]
    var version = "1.0"
}
That’s not enough to make the struct work, because we’re missing three things:
这还不足以使结构体正常工作,因为我们缺少三样东西:
- We need an initializer we can call to create a new document on demand.
我们需要一个初始化器,我们可以调用它来按需创建新文档。 - We need an initializer SwiftUI can call to load a saved document. This won’t actually happen, but we need to support it.
我们需要一个 SwiftUI 可以调用的初始化器来加载已保存的文档。这实际上不会发生,但我们需要支持它。 - We need a method to convert our document to JSON and send it back.
我们需要一种方法将我们的文档转换为 JSON 并将其发送回去。
None of those are tricky, but the latter two require a little knowledge because of the way Apple’s platforms handles files. Many types of files, such as apps, Xcode projects, and more, are actually packages – directories with an extension such as “.app” or “.xcodeproj”, that Apple’s operating systems treat as individual files. Of course, many other files such as Markdown files or JPEGs are just simple files rather than packages.
这些都不棘手,但由于 Apple 平台处理文件的方式,后两者需要一点知识。许多类型的文件(例如 App、Xcode 项目等)实际上是包,即带有扩展名(如“.app”或“.xcodeproj”)的目录,Apple 的作系统将其视为单个文件。当然,许多其他文件(如 Markdown 文件或 JPEG)只是简单的文件,而不是包。
Apple has a really neat solution for working with any kind of file, whether it’s a package or a regular file, and it’s called FileWrapper. This can point to a file, a directory, or even a link from one place to another, but all are handled equally well.
Apple 有一个非常简洁的解决方案,可以处理任何类型的文件,无论是包还是常规文件,它被称为 FileWrapper。这可以指向一个文件、一个目录,甚至是一个从一个地方到另一个地方的链接,但所有这些都得到了同样好的处理。
Let’s start implementing our code. First, we need an initializer we can call to create a new document:
让我们开始实现我们的代码。首先,我们需要一个初始化器,我们可以调用它来创建新文档:
init(sourceLanguage: String, strings: [String: TranslationString] = [:]) {
    self.sourceLanguage = sourceLanguage
    self.strings = strings
}
Next, we need an initializer that creates a new document from an existing file. This needs to work with a file wrapper that represents a regular file, like this:
接下来,我们需要一个初始化器,用于从现有文件创建新文档。这需要使用表示常规文件的文件包装器,如下所示:
init(configuration: ReadConfiguration) throws {
    if let data = configuration.file.regularFileContents {
        self = try JSONDecoder().decode(TranslationDocument.self, from: data)
    } else {
        sourceLanguage = "en"
        strings = [:]
    }
}
And finally we need a method to return a file wrapper containing the JSON version of our document. I’m going to use pretty printing and sorted keys for the JSON encoding because it’s much easier to read, but that’s just personal preference.
最后,我们需要一个方法来返回包含文档的 JSON 版本的文件包装器。我将使用 Pretty printing 和 sorted keys 进行 JSON 编码,因为它更容易阅读,但这只是个人喜好。
Add this last method to TranslationDocument:
将最后一个方法添加到 TranslationDocument 中:
func fileWrapper(configuration: WriteConfiguration) throws -> FileWrapper {
    let encoder = JSONEncoder()
    encoder.outputFormatting = [.prettyPrinted, .sortedKeys]
    let data = try encoder.encode(self)
    return FileWrapper(regularFileWithContents: data)
}
That completes our document type, but it’s not quite ready for SwiftUI to use just yet. You see, macOS doesn’t understand how to work with files of the type com.apple.xcode.xcstrings – it doesn’t know what file extension it should use, nor what the actual data type is.
这样就完成了我们的文档类型,但还没有完全准备好供 SwiftUI 使用。你看,macOS 不了解如何处理 com.apple.xcode.xcstrings 类型的文件——它不知道它应该使用什么文件扩展名,也不知道实际的数据类型是什么。
So, before we actually use our new document with SwiftUI, we need to declare its data type in the list of Exported Type Identifiers for our project. That means selecting the AutoTranslate target, going to the Info tab, opening the Exported Type Identifiers group, then pressing + there to add a new entry.
因此,在我们实际将新文档与 SwiftUI 一起使用之前,我们需要在项目的 Exported Type Identifiers 列表中声明其数据类型。这意味着选择 AutoTranslate 目标,转到 Info 选项卡,打开 Exported Type Identifiers 组,然后按 + 添加新条目。
The information you’ll need is:
您需要的信息是:
- Description: Xcode string catalog
描述:Xcode 字符串目录 - Identifier: com.apple.xcode.xcstrings
标识符:com.apple.xcode.xcstrings - Conforms To: public.json 符合:public.json
- Extensions: xcstrings 扩展名:xcstrings
That gives macOS everything it needs to write out Xcode string catalogs, so we can now go over to the Signing & Capabilities tab to make sure we say we’re writing user files. This is under the App Sandbox group – look for File Access, and change User Selected File from Read Only to Read/Write.
这为macOS提供了写出Xcode字符串目录所需的一切,因此我们现在可以转到签名和功能选项卡以确保我们说我们正在编写用户文件。它位于 App Sandbox 组下 – 查找 File Access,并将 User Selected File 从 Read Only 更改为 Read/Write。
Okay, now we’re ready for SwiftUI.
好了,现在 我们已经准备好使用 SwiftUI。
Currently our translation system finishes by simply showing the text “Done”. What we want instead is a new button to be shown that allows us to export a valid Xcode string catalog directly from our app, which the user can then add to any project they want.
目前,我们的翻译系统仅通过显示文本 “Done” 来完成。相反,我们想要显示一个新按钮,它允许我们直接从我们的应用程序导出有效的 Xcode 字符串目录,然后用户可以将其添加到他们想要的任何项目中。
Making this work is done in five small steps.
这项工作分五个小步骤完成。
The first step is to add two properties in ContentView: one to track the current document we’re building, and one to track whether we’re currently exporting that to JSON or not.
第一步是在 ContentView 中添加两个属性:一个用于跟踪我们正在构建的当前文档,另一个用于跟踪我们当前是否正在将其导出为 JSON。
Add these two now: 现在添加这两个:
@State private var showingExporter = false
@State private var document = TranslationDocument(sourceLanguage: "en")
The second step is to write a method to be called when saving completes. This will be given the result of saving our file, and we can do whatever we want based on whether it succeeded or failed. I’m just going to print the result to the debug console regardless, so add this to ContentView:
第二步是编写一个在保存完成时要调用的方法。这将得到保存文件的结果,我们可以根据它是成功还是失败来做任何我们想做的事情。无论如何,我都要将结果打印到调试控制台,因此请将以下内容添加到 ContentView:
func handleSaveResult(_ result: Result<URL, Error>) {
    switch result {
    case .success(let url):
        print("Saved to \(url)")
    case .failure(let error):
        print(error.localizedDescription)
    }
}
The third step is to connect our two properties and method up to SwiftUI, which is done using the fileExporter() modifier. This will write our document out to a file of the user’s choosing whenever showingExporter is true.
第三步是将我们的两个属性和方法连接到 SwiftUI,这是使用 fileExporter() 修饰符完成的。每当 showingExporter 为 true 时,这会将我们的文档写出到用户选择的文件中。
Add this below onChange():
在 onChange() 下方添加以下内容:
.fileExporter(isPresented: $showingExporter, document: document, contentType: .xcStrings, defaultFilename: "Localizable", onCompletion: handleSaveResult)
The fourth step is to change the “Done” text to a button that shows our file exporter:
第四步是将 “Done” 文本更改为显示文件导出器的按钮:
Button("Export") {
    showingExporter = true
}
And the last step… well, this is the trickiest one. We’ve put everything in place to create and export a document, but we haven’t actually populated the document.
最后一步……嗯,这是最棘手的。我们已经准备好创建和导出文档,但实际上还没有填充文档。
Right now our translation logic is trivial: we translate exactly one string based on what the user has typed, then print it to the debug console. Now it’s time for that to change, and instead we’re going to:
现在我们的翻译逻辑很简单:我们根据用户输入的内容只翻译一个字符串,然后将其打印到调试控制台。现在是时候改变这种情况了,相反,我们将:
- Split our user’s string into an array of strings based on line breaks.
根据换行符将用户的字符串拆分为字符串数组。 - Convert each of those lines into a translation request.
将每一行都转换为翻译请求。 - Translate each of those into our current target language.
将它们中的每一个翻译成我们当前的目标语言。 - Add them to our document in the correct place.
将它们添加到我们的文档中的正确位置。
The first three of those are straightforward, but the fourth is trickier. So, let’s start with the easier part – find these two lines in the translate() method:
其中前三个很简单,但第四个比较棘手。所以,让我们从更简单的部分开始 —— 在 translate() 方法中找到这两行:
let result = try await session.translate(input)
print(result.targetText)
And replace them with this:
并将它们替换为以下内容:
let inputStrings = input.components(separatedBy: .newlines)

let requests = inputStrings.map { TranslationSession.Request(sourceText: $0) }

for response in try await session.translations(from: requests) {
    // more code to come
}
Inside that loop we need to place each translated string in the correct location in our document, which starts by wrapping the text in a TranslationUnit struct:
在该循环中,我们需要将每个翻译后的字符串放在文档中的正确位置,首先将文本包装在 TranslationUnit 结构中:
let translationUnit = TranslationUnit(value: response.targetText)
Next, we need to read the current TranslationString object for the English string we’re translating. This might already exist from a different language, but if it doesn’t we’ll create a new one:
接下来,我们需要读取我们正在翻译的英语字符串的当前 TranslationString 对象。这可能已经存在于其他语言中,但如果不存在,我们将创建一个新的:
var currentTranslationString = document.strings[response.sourceText] ?? TranslationString()
We can then update that translation string with the new localization. This is a dictionary where the keys are the languages we’re translating, and the values are a TranslationLanguage instance containing the string unit we just translated. Like I said earlier it’s quite a complex structure, but it’s not ours so we’re stuck with it!
然后,我们可以使用新的本地化来更新该翻译字符串。这是一个字典,其中键是我们正在翻译的语言,值是一个 TranslationLanguage 实例,其中包含我们刚刚翻译的字符串单元。就像我之前说的,这是一个相当复杂的结构,但它不是我们的,所以我们只能坚持下去!
Add this line after the previous two:
在前两行之后添加此行:
currentTranslationString.localizations[response.targetLanguage.minimalIdentifier] = TranslationLanguage(stringUnit: translationUnit)
Finally, we need to update our document with the new translation string:
最后,我们需要使用新的翻译字符串更新我们的文档:
document.strings[response.sourceText] = currentTranslationString
That completes updating the document as our translation comes in, but now that we’re filling our document in with translations, we should also make sure to clear it out at the start of a new translation run. This means removing all the strings in the createAllTranslations() method, by adding this before the call to doNextTranslation()
这样就完成了在翻译时更新文档,但现在我们正在用翻译填充文档,我们还应该确保在新的翻译运行时将其清除。这意味着删除 createAllTranslations() 方法中的所有字符串,方法是在调用 doNextTranslation() 之前添加此字符串
document.strings.removeAll()
That completes the code, and completes the project too! Give it a try – you should find you can translate lots of strings into lots of languages now, export it to a string catalog, then drag that into Xcode ready for use!
这样就完成了代码,也完成了项目!试一试 – 您应该会发现您现在可以将大量字符串翻译成多种语言,将其导出到字符串目录,然后将其拖到 Xcode 中以供使用!
There’s so much more this app could do if you wanted, but I think a great place to start would be making it a document-based app that loaded existing string catalogs – it would allow you load previous work more easily, including all the strings and the supported languages.
如果你愿意,这个应用程序可以做更多的事情,但我认为一个很好的起点是使其成为一个基于文档的应用程序,加载现有的字符串目录——它允许你更轻松地加载以前的工作,包括所有字符串和支持的语言。


暂无评论内容