

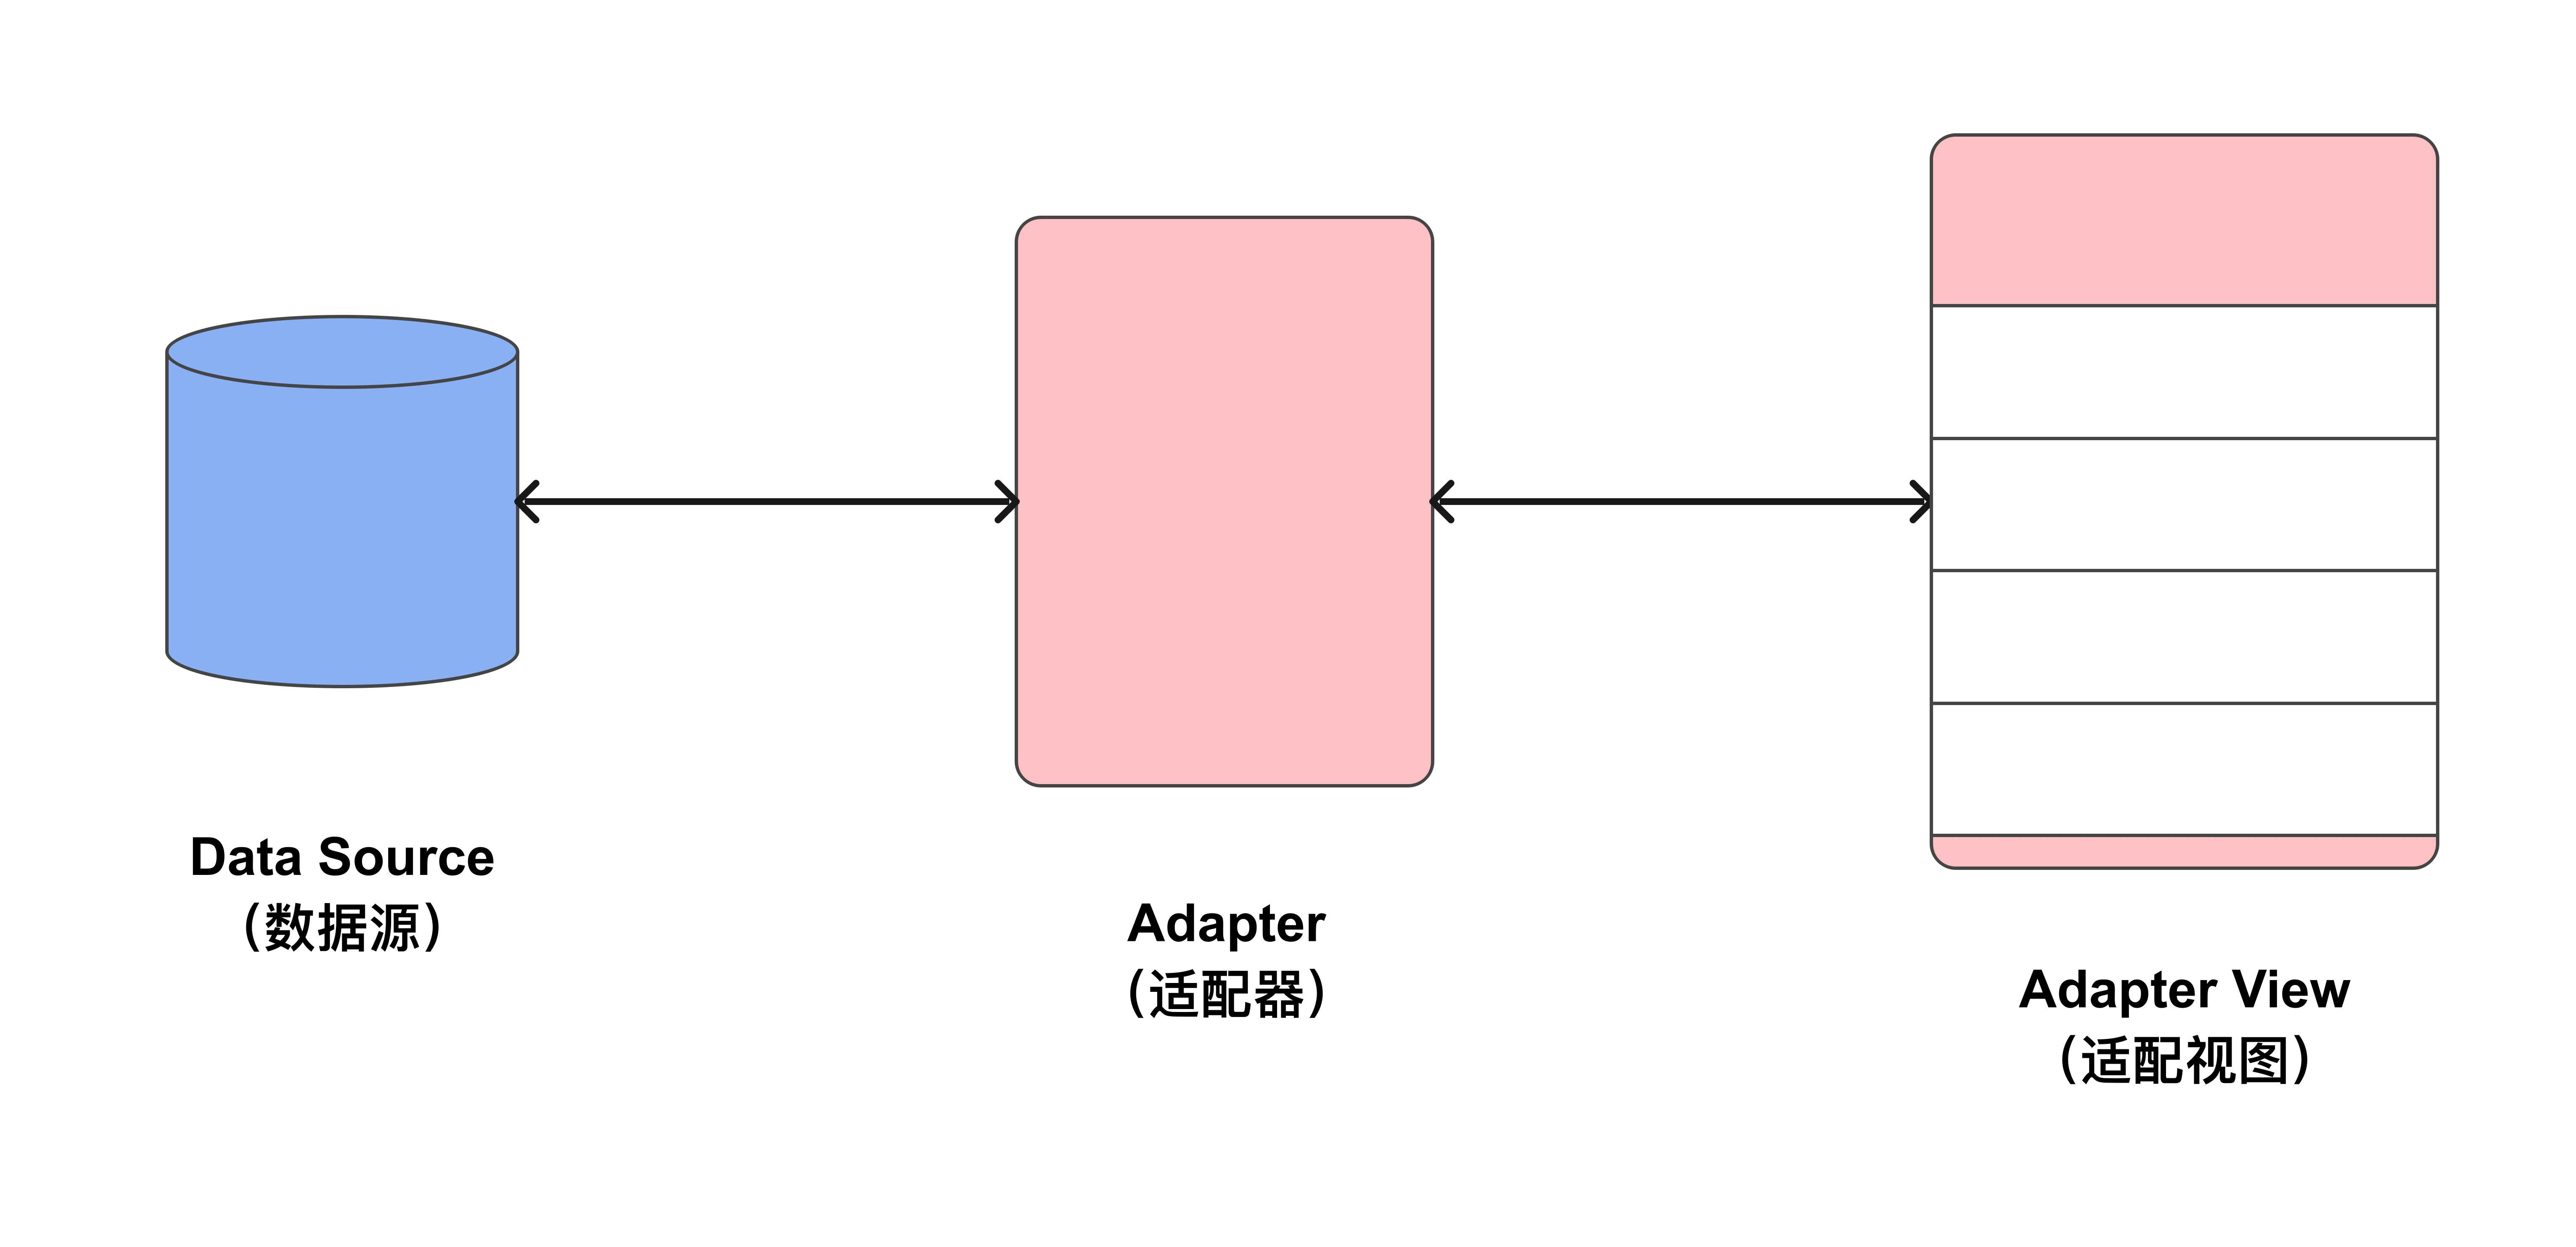
2025-11-24 09:28:10,某些文章具有时效性,若有错误或已失效,请在下方留言。Data Binding(数据绑定) 是一个支持库,它允许你在布局中使用声明式格式将 UI 组件绑定到应用中的数据源,而不是通过代码进行绑定。
数据绑定是将 XML 布局中的视图与数据对象进行整合的过程。Data Binding 负责生成此过程中所需的类。使用数据绑定时,系统会创建一个 binding 对象,其中包含对布局中每个视图的引用,因此 Android 系统不需要再通过视图 ID 一次次地去查找这些视图。
数据绑定基本使用
布局文件被 <layout></layout> 包裹,其名称是 activity_main。基于此,Android Data Binding 库将会创建一个名为 ActvityMainBinding 的绑定对象。
1. 开启数据绑定
在 build.gradle.kts Data Binding。
plugins {
    alias(libs.plugins.android.application)
}

android {
    namespace = "com.stewednoodles.databindingapp"
    compileSdk {
        version = release(36)
    }

    defaultConfig {
        applicationId = "com.stewednoodles.databindingapp"
        minSdk = 24
        targetSdk = 36
        versionCode = 1
        versionName = "1.0"

        testInstrumentationRunner = "androidx.test.runner.AndroidJUnitRunner"
    }

    buildTypes {
        release {
            isMinifyEnabled = false
            proguardFiles(
                getDefaultProguardFile("proguard-android-optimize.txt"),
                "proguard-rules.pro"
            )
        }
    }
    compileOptions {
        sourceCompatibility = JavaVersion.VERSION_11
        targetCompatibility = JavaVersion.VERSION_11
    }

    // 1. 开启 data binding
    buildFeatures {
        dataBinding = true
    }
}

dependencies {
    implementation(libs.appcompat)
    implementation(libs.material)
    implementation(libs.activity)
    implementation(libs.constraintlayout)
    testImplementation(libs.junit)
    androidTestImplementation(libs.ext.junit)
    androidTestImplementation(libs.espresso.core)
}
2. <layout> 标记
<layout></layout> 作为根元素,对布局文件进行标记。
<?xml version="1.0" encoding="utf-8"?>
<!--2. <layout> 作为根元素进行标记-->
<layout xmlns:android="http://schemas.android.com/apk/res/android"
    xmlns:app="http://schemas.android.com/apk/res-auto"
    xmlns:tools="http://schemas.android.com/tools">
    <!--3. 数据绑定
         - person 变量绑定 Person 类
         - person 变量的使用方式 @{person.name}
     -->
    <data>
        <variable
            name="person"
            type="com.stewednoodles.databindingapp.Person" />
    </data>
    <androidx.constraintlayout.widget.ConstraintLayout
        android:id="@+id/main"
        android:layout_width="match_parent"
        android:layout_height="match_parent"
        tools:context=".MainActivity">

        <TextView
            android:layout_width="wrap_content"
            android:layout_height="wrap_content"
            android:text="@{person.name}"
            app:layout_constraintBottom_toBottomOf="parent"
            app:layout_constraintEnd_toEndOf="parent"
            app:layout_constraintStart_toStartOf="parent"
            app:layout_constraintTop_toTopOf="parent" />

    </androidx.constraintlayout.widget.ConstraintLayout>
</layout>
3. 数据的绑定
使用<data>、<variable> 标签进行数据的绑定,下面的代码就是将变量 person 绑定到 Person 实例中。
<!--3. 数据绑定
     - person 变量绑定 Person 类
     - person 变量的使用方式 @{person.name}
 -->
<data>
    <variable
        name="person"
        type="com.stewednoodles.databindingapp.Person" />
</data>
Person 文件的内容
package com.stewednoodles.databindingapp;

public class Person {
    private String name;
    private String email;

    public Person(String name, String email) {
        this.name = name;
        this.email = email;
    }

    public String getName() {
        return name;
    }

    public void setName(String name) {
        this.name = name;
    }

    public String getEmail() {
        return email;
    }

    public void setEmail(String email) {
        this.email = email;
    }

    public Person() {
    }
}
4. 变量的使用
变量绑定之后,使用 @{} 对变量进行引用。
<TextView
    android:layout_width="wrap_content"
    android:layout_height="wrap_content"
    android:text="@{person.name}"
    app:layout_constraintBottom_toBottomOf="parent"
    app:layout_constraintEnd_toEndOf="parent"
    app:layout_constraintStart_toStartOf="parent"
    app:layout_constraintTop_toTopOf="parent" />
5. MainActivity
MainActivity 中的代码,如下所示
package com.stewednoodles.databindingapp;

import android.os.Bundle;

import androidx.activity.EdgeToEdge;
import androidx.appcompat.app.AppCompatActivity;
import androidx.core.graphics.Insets;
import androidx.core.view.ViewCompat;
import androidx.core.view.WindowInsetsCompat;
import androidx.databinding.DataBindingUtil;

import com.stewednoodles.databindingapp.databinding.ActivityMainBinding;

public class MainActivity extends AppCompatActivity {

    //
    private ActivityMainBinding binding;

    @Override
    protected void onCreate(Bundle savedInstanceState) {
        super.onCreate(savedInstanceState);
        EdgeToEdge.enable(this);
        setContentView(R.layout.activity_main);
        ViewCompat.setOnApplyWindowInsetsListener(findViewById(R.id.main), (v, insets) -> {
            Insets systemBars = insets.getInsets(WindowInsetsCompat.Type.systemBars());
            v.setPadding(systemBars.left, systemBars.top, systemBars.right, systemBars.bottom);
            return insets;
        });
        // 数据实例
        Person person = new Person("Stewed Noodles", "stewednoodles.co@gmail.com");

        // 绑定数据
        binding = DataBindingUtil.setContentView(this, R.layout.activity_main);
        binding.setPerson(person);
    }
}
6. 运行效果
最终的运行效果,如下图所示
![图片[1]-Data Binding 数据绑定-Stewed Noodles 资源](https://cdn.sa.net/2025/11/20/OjmQxVrdU1CiHbg.webp)
数据绑定事件处理
1. 创建事件处理类
添加事件处理类 MyClickHandler,代码内容如下所示
package com.stewednoodles.databindingapp;

import android.content.Context;
import android.view.View;
import android.widget.Toast;

public class MyClickHandler {
    Context mContext;

    public MyClickHandler(Context mContext) {
        this.mContext = mContext;
    }

    public void onButton1Click(View view) {
        Toast.makeText(mContext, "First Button is clicked!", Toast.LENGTH_SHORT).show();
    }
}
2. 创建<data> 标签变量
在布局文件 activity_main.xml 文件的 <data> 标签中,引入 clickHandler 变量。
<?xml version="1.0" encoding="utf-8"?><!--2. <layout> 作为根元素进行标记-->
<layout xmlns:android="http://schemas.android.com/apk/res/android"
    xmlns:app="http://schemas.android.com/apk/res-auto"
    xmlns:tools="http://schemas.android.com/tools">
    <!--3. 数据绑定
         - person 变量绑定 Person 类
         - person 变量的使用方式 @{person.name}
     -->
    <data>
        <!--创建变量-->
        <variable
            name="person"
            type="com.stewednoodles.databindingapp.Person" />
        <!--创建方法变量-->
        <variable
            name="clickHandler"
            type="com.stewednoodles.databindingapp.MyClickHandler" />
    </data>

    <androidx.constraintlayout.widget.ConstraintLayout
        android:id="@+id/main"
        android:layout_width="match_parent"
        android:layout_height="match_parent"
        tools:context=".MainActivity">

        <TextView
            android:layout_width="wrap_content"
            android:layout_height="wrap_content"
            android:text="@{person.name}"
            app:layout_constraintBottom_toBottomOf="parent"
            app:layout_constraintEnd_toEndOf="parent"
            app:layout_constraintStart_toStartOf="parent"
            app:layout_constraintTop_toTopOf="parent" />

        <!--绑定按钮点击事件
            - 使用 @{} 引入 方法变量 clickHandler
            - 使用 :: 引入 方法
        -->
        <Button
            android:onClick="@{clickHandler::onButton1Click}"
            android:layout_width="wrap_content"
            android:layout_height="wrap_content"
            android:layout_marginTop="128dp"
            android:text="Click Me!"
            app:layout_constraintEnd_toEndOf="parent"
            app:layout_constraintStart_toStartOf="parent"
            app:layout_constraintTop_toTopOf="parent" />
    </androidx.constraintlayout.widget.ConstraintLayout>
</layout>
3. Button 绑定事件
绑定按钮点击事件,使用 @{} 引入 方法变量 clickHandler。变量 clickHandler 与方法名 onButton1Click 之间使用::。
<?xml version="1.0" encoding="utf-8"?><!--2. <layout> 作为根元素进行标记-->
<layout xmlns:android="http://schemas.android.com/apk/res/android"
    xmlns:app="http://schemas.android.com/apk/res-auto"
    xmlns:tools="http://schemas.android.com/tools">
    <!--3. 数据绑定
         - person 变量绑定 Person 类
         - person 变量的使用方式 @{person.name}
     -->
    <data>
        <!--创建变量-->
        <variable
            name="person"
            type="com.stewednoodles.databindingapp.Person" />
        <!--创建方法变量-->
        <variable
            name="clickHandler"
            type="com.stewednoodles.databindingapp.MyClickHandler" />
    </data>

    <androidx.constraintlayout.widget.ConstraintLayout
        android:id="@+id/main"
        android:layout_width="match_parent"
        android:layout_height="match_parent"
        tools:context=".MainActivity">

        <TextView
            android:layout_width="wrap_content"
            android:layout_height="wrap_content"
            android:text="@{person.name}"
            app:layout_constraintBottom_toBottomOf="parent"
            app:layout_constraintEnd_toEndOf="parent"
            app:layout_constraintStart_toStartOf="parent"
            app:layout_constraintTop_toTopOf="parent" />

        <!--绑定按钮点击事件
            - 使用 @{} 引入 方法变量 clickHandler
            - 使用 :: 引入 方法
        -->
        <Button
            android:onClick="@{clickHandler::onButton1Click}"
            android:layout_width="wrap_content"
            android:layout_height="wrap_content"
            android:layout_marginTop="128dp"
            android:text="Click Me!"
            app:layout_constraintEnd_toEndOf="parent"
            app:layout_constraintStart_toStartOf="parent"
            app:layout_constraintTop_toTopOf="parent" />
    </androidx.constraintlayout.widget.ConstraintLayout>
</layout>
4. Activity 绑定事件
在 MainActivity 中,绑定点击事件。
package com.stewednoodles.databindingapp;

import android.os.Bundle;

import androidx.activity.EdgeToEdge;
import androidx.appcompat.app.AppCompatActivity;
import androidx.core.graphics.Insets;
import androidx.core.view.ViewCompat;
import androidx.core.view.WindowInsetsCompat;
import androidx.databinding.DataBindingUtil;

import com.stewednoodles.databindingapp.databinding.ActivityMainBinding;

public class MainActivity extends AppCompatActivity {

    //
    private ActivityMainBinding binding;
    private MyClickHandler clickHandler;

    @Override
    protected void onCreate(Bundle savedInstanceState) {
        super.onCreate(savedInstanceState);
        EdgeToEdge.enable(this);
        setContentView(R.layout.activity_main);
        ViewCompat.setOnApplyWindowInsetsListener(findViewById(R.id.main), (v, insets) -> {
            Insets systemBars = insets.getInsets(WindowInsetsCompat.Type.systemBars());
            v.setPadding(systemBars.left, systemBars.top, systemBars.right, systemBars.bottom);
            return insets;
        });
        // 数据实例
        Person person = new Person("Stewed Noodles", "stewednoodles.co@gmail.com");

        // 绑定数据
        binding = DataBindingUtil.setContentView(this, R.layout.activity_main);
        binding.setPerson(person);

        // 绑定点击事件
        clickHandler = new MyClickHandler(this);
        binding.setClickHandler(clickHandler);
    }
}
5. 运行效果
运行效果,如下所示
双向绑定
BaseObservable 介绍
BaseObservable 是 Android Data Binding 提供的一个基类,让普通的 Java/Kotlin 对象具备“可观察”能力。
当对象的属性改变时,可以调用 notifyPropertyChanged() 来通知 UI 更新,无需手动 setTex() 或刷新界面。使用于
- MVVM 中的 Model
- 表单双向绑定
- 需要自动刷新 UI 的 POJO 数据类
使用步骤
1. Model 继承 BaseObservable
public class User extends BaseObservable {

    private String name;

    @Bindable
    public String getName() { return name; }

    public void setName(String name) {
        this.name = name;
        notifyPropertyChanged(BR.name);
    }
}
2. 布局中绑定
<layout>
    <data>
        <variable
            name="user"
            type="com.example.User" />
    </data>

    <TextView
        android:text="@{user.name}" />

    <EditText
        android:text="@={user.name}" /> <!-- 双向绑定 -->
</layout>
注意:布局文件中双向绑定中使用的是 @={}。
示例代码
模型类 Person 的内容,如下所示
package com.stewednoodles.databindingapp;

import androidx.databinding.BaseObservable;
import androidx.databinding.Bindable;

//
public class Person extends BaseObservable {
    private String name;
    private String email;

    public Person(String name, String email) {
        this.name = name;
        this.email = email;
    }

    @Bindable
    public String getName() {
        return name;
    }

    public void setName(String name) {
        this.name = name;
        notifyPropertyChanged(BR.name);
    }

    public String getEmail() {
        return email;
    }

    public void setEmail(String email) {
        this.email = email;
    }

    public Person() {
    }
}
布局文件的内容,如下所示
<?xml version="1.0" encoding="utf-8"?><!--2. <layout> 作为根元素进行标记-->
<layout xmlns:android="http://schemas.android.com/apk/res/android"
    xmlns:app="http://schemas.android.com/apk/res-auto"
    xmlns:tools="http://schemas.android.com/tools">
    <!--3. 数据绑定
         - person 变量绑定 Person 类
         - person 变量的使用方式 @{person.name}
     -->
    <data>
        <!--创建变量-->
        <variable
            name="person"
            type="com.stewednoodles.databindingapp.Person" />
        <!--创建方法变量-->
        <variable
            name="clickHandler"
            type="com.stewednoodles.databindingapp.MyClickHandler" />
    </data>

    <androidx.constraintlayout.widget.ConstraintLayout
        android:id="@+id/main"
        android:layout_width="match_parent"
        android:layout_height="match_parent"
        tools:context=".MainActivity">

        <TextView
            android:layout_width="wrap_content"
            android:layout_height="wrap_content"
            android:text="@{person.name}"
            app:layout_constraintBottom_toBottomOf="parent"
            app:layout_constraintEnd_toEndOf="parent"
            app:layout_constraintStart_toStartOf="parent"
            app:layout_constraintTop_toTopOf="parent" />

        <!--绑定按钮点击事件
            - 使用 @{} 引入 方法变量 clickHandler
            - 使用 :: 引入 方法
        -->
        <Button
            android:id="@+id/button"
            android:layout_width="wrap_content"
            android:layout_height="wrap_content"
            android:layout_marginTop="128dp"
            android:onClick="@{clickHandler::onButton1Click}"
            android:text="Click Me!"
            app:layout_constraintEnd_toEndOf="parent"
            app:layout_constraintStart_toStartOf="parent"
            app:layout_constraintTop_toTopOf="parent" />

        <TextView
            android:id="@+id/text_view2"
            android:layout_width="0dp"
            android:layout_height="wrap_content"
            android:layout_marginBottom="189dp"
            android:text="@{person.name}"
            android:textSize="32sp"
            app:layout_constraintBottom_toBottomOf="parent"
            app:layout_constraintEnd_toEndOf="parent"
            app:layout_constraintStart_toStartOf="parent" />

        <EditText
            android:text="@={person.name}"
            android:id="@+id/edit_text"
            android:layout_width="0dp"
            android:layout_height="wrap_content"
            android:layout_marginBottom="104dp"
            app:layout_constraintBottom_toBottomOf="parent"
            app:layout_constraintEnd_toEndOf="parent"
            app:layout_constraintStart_toStartOf="parent" />
    </androidx.constraintlayout.widget.ConstraintLayout>
</layout>
最终的运行效果,如下所示


暂无评论内容