
2024-08-01 14:24:49,某些文章具有时效性,若有错误或已失效,请在下方留言。MVVM 工作原理
MVVM – 模型、视图、ViewModel,理解 MVVM 的最佳方式是这样的:除了创建一个新类 ViewModel 负责将模型中的数据转换为视图中的格式化值之外,它与 MVC 别无二致。
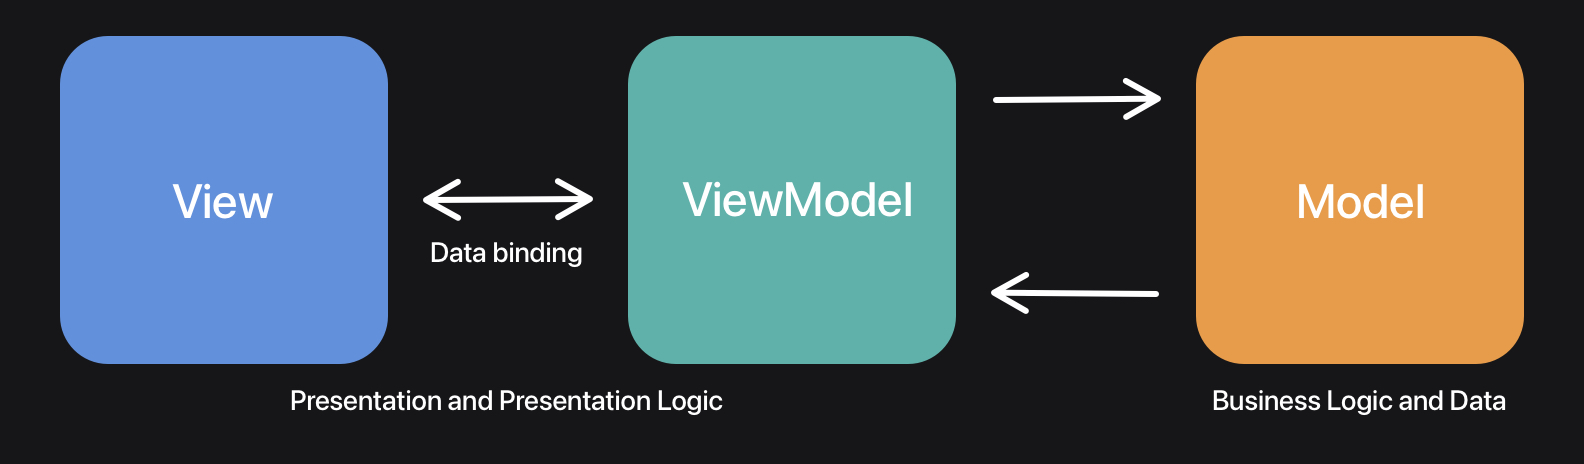
MVVM 模式由三层组成:
- View 视图
- ViewModel 视图模型
- Model 模型
View 视图
这里是视图的定义,在 SwiftUI 中,这里将是您的声明视图定义。
ViewModels 视图模型
视图模型,负责从模型中读取数据并将其转换为视图可以使用的形式。视图直接与视图模型的属性绑定,以发送和接收更新。由于视图模型没有对视图的引用,因此可以与多个视图一起重复使用。
Model 模型
模型指的是领域模型。例如,ContactView会有一个ContactViewModel,作为与Contact领域模型的通信层。
关键规则
- 视图只与视图模型通信
- 视图对视图模型背后的(域)模型一无所知
ViewModel没有对View的引用,因此可与任何View一起使用。
SwiftUI 使用 MVVM
如果不使用 MVVM 模式,ContactView 的代码如下
struct Contact {
    let name: String
}

struct ContactView: View {

    let contact: Contact

    var body: some View {
        VStack {
            Text("Name: \(contact.name)")
            Button("Delete", action: deleteContact)
        }
    }

    func deleteContact() {
        // Perform contact deletion
    }
}
可以利用 MVVM 架构编码模式重写这一逻辑。为了优雅地迁移,我们首先只将元数据与新的ContactViewModel 类型连接起来:
struct ContactViewModel {
    /// A public accessor to the contact's name.
    /// Implementors don't know the name is coming from a `Contact` type.
    var name: String { contact.name }

    /// Keep a reference to the (domain) model so we can perform any actions like deleting.
    private let contact: Contact

    /// The ViewModel only references the `Contact` model, but has no link to the view that's using the ViewModel.
    init(contact: Contact) {
        self.contact = contact
    }
}
现在可以更新ContactView以使用这个新的 ViewModel:
struct ContactView: View {

    let viewModel: ContactViewModel

    var body: some View {
        VStack {
            Text("Name: \(viewModel.name)")
            Button("Delete", action: deleteContact)
        }
    }

    func deleteContact() {
        // Perform contact deletion
    }
}
从视图中提取业务逻辑
将业务逻辑提取到一个单一的负责类型中,这样就形成了 ViewModel,而 ViewModel 只是一个通信层。
struct ContactView: View {

    let viewModel: ContactViewModel

    var body: some View {
        VStack {
            Text("Name: \(viewModel.name)")
            Button("Delete", action: viewModel.deleteContact)
        }
    }
}

struct ContactViewModel {

    /// ...

    func deleteContact() {
        // Perform contact deletion
    }
}
最终的ContactView实现不再与特定模型或业务逻辑相连。它只与 ViewModel 通信,而 ViewModel 是视图与模型之间的通信层。
使用协议提高 MVVM 视图可重用性
通过使用协议,您可以让视图变得更加灵活。
protocol ContactViewModel {
    var name: String { get }

    func deleteContact()
}
我们不必更新 View,因为它已经使用相同的类型名称进行通信,但我们确实需要将原来的ContactViewModel重命名为LocalContactViewModel。它还必须符合ContactViewModel协议:
struct LocalContactViewModel: ContactViewModel {
    var name: String { contact.name }
    private let contact: Contact

    init(contact: Contact) {
        self.contact = contact
    }

    func deleteContact() {
        // Perform contact deletion **locally**.
    }
}
最后,可以开始定义一个新的RemoteContactViewModel,它将作为ContactView和RemoteContact 之间的通信层:
struct RemoteContact {
    let name: String
}

struct RemoteContactViewModel: ContactViewModel {
    var name: String { contact.name }
    private let contact: RemoteContact

    init(contact: RemoteContact) {
        self.contact = contact
    }

    func deleteContact() {
        // Perform contact deletion **remotely**.
        // Potentially using a network request.
    }
}
使用这种协议的好处是,它允许您将同一个ContactView与多种类型的 ViewModels 实例化,并与不同的(领域)模型通信:
let localViewModel = LocalContactViewModel(contact: Contact(name: "Antoine"))
let remoteViewModel = RemoteContactViewModel(contact: RemoteContact(name: "Antoine"))

/// We use the same `ContactView`, but different `ContactViewModel` types.
let localContactView = ContactView(viewModel: localViewModel)
let remoteContactView = ContactView(viewModel: remoteViewModel)


暂无评论内容